- Overview
- Trusted Setup
- Non-Quadratic Constraints
- Groth16 and PLONK Protocols
- Proof Generation, Computing Witness, Verification and Testing
Overview
ZKSNARKS are a powerful cryptographic tool that can enable zero-knowledge proofs, which are a way of verifying the validity of a computation without revealing any information about the inputs or outputs. ZKSNARKS can be used to create privacy-preserving applications, such as anonymous transactions, verifiable computation, and decentralized identity. However, working with ZKSNARKS is not easy, as it requires a deep understanding of the underlying mathematical and cryptographic primitives, as well as the practical challenges of implementing them.
In this article, we will guide you through the process of mastering practical knowledge of working with ZKSNARKS and cryptographic primitives. We will cover the following topics in detail and show you how they are done in practice:
- Trusted Setup: How to generate the public parameters and the proving and verification keys for a ZKSNARK circuit.
- Exponentiation ZK Circuit: How to design and implement a ZK circuit that performs exponentiation over a finite field.
- Hashing with keccak ZK Circuit: How to design and implement a ZK circuit that performs hashing with the keccak algorithm.
- Sparse Merkle Tree ZK Circuit: How to design and implement a ZK circuit that proves membership or non-membership in a sparse Merkle tree.
- Workflow automation for development of ZK Circuits: How to use tools and frameworks to automate the development and testing of ZK circuits.
By the end of this article, you will have a solid foundation of working with ZKSNARKS and cryptographic primitives, and you will be able to apply them to your own projects. Let’s get started!
Trusted Setup
A trusted setup is a process that involves generating some parameters that are used for creating and verifying zero-knowledge proofs. As we have seen, Zero-knowledge proofs are a type of cryptographic technique that allow a prover to convince a verifier that a statement is true, without revealing any information about the statement or the proof.
A trusted setup is needed for some types of zero-knowledge proofs, such as zk-SNARKs, which are very efficient and compact proofs. The trusted setup requires some participants to create some random values, use them to generate the parameters, and then destroy them. The parameters are then published and used by anyone who wants to create or verify proofs. However, the trusted setup also introduces some risks and challenges, such as:
- If the random values are not destroyed, they can be used to create fake proofs or reveal information about the proofs.
- If the participants collude or are compromised, they can create fake proofs or reveal information about the proofs.
- If the parameters are corrupted or tampered with, they can affect the security and validity of the proofs.
Therefore, a trusted setup requires a lot of trust and care from the participants and the users of the parameters. There are also some alternatives to trusted setups, such as zk-STARKs, which do not require any setup phase and are more secure and transparent, but also less efficient and more complex.
Powers of Tau Ceremony
Question: What is a Powers of Tau ceremony? Explain why this is important in the setup of zk-SNARK applications.
Answer: A Powers of Tau ceremony is a type of trusted setup that involves multiple parties who contribute random values to create a common reference string (CRS). The CRS is a set of parameters that are used for generating and verifying zero-knowledge proofs.
The Powers of Tau ceremony is important for the setup of zk-SNARK applications because it enables the creation of efficient and secure zero-knowledge proofs for various computations. For example, zk-SNARKs can be used to enhance the privacy and scalability of blockchain technologies, such as Zcash or ZKSync. However, the Powers of Tau ceremony also poses some challenges and limitations for zk-SNARK applications, such as requiring trust in the participants and the parameters, and being specific to a certain size or type of computation.
The key idea behind the Powers of Tau ceremony is that each party generates a random value and uses it to update the CRS. The random value is then destroyed, so that no one can access it. The CRS is then passed on to the next party, who repeats the same process. This way, each party adds some randomness to the CRS, making it more secure and unpredictable. However, this also means that each party needs to keep their random value secret, because if anyone knows all the random values, they can create fake proofs or reveal information about the proofs. Therefore, the Powers of Tau ceremony requires a lot of trust and care from the participants and the users of the CRS.
We will learn how to do a trusted setup using both Groth16 and Plonk ZKP protocols.
For this hands on experience, we will clone this github repo and work through step by step.
git clone https://github.com/adrianmcli/week1
cd week1/Q2
npm install
Open the Circom file HellowWorld.circom located in the folder contracts/circuits. This is a circom circuit template for checking if c is equal to the product of a and b.
pragma circom 2.1.4;

// This circuit template checks that c is the product of a and b.
template Multiplier2 () {

   // Declaration of signals.
   signal input a; // The first input to the circuit.
   signal input b; // The second input to the circuit.
   signal output c; // The output of the circuit.

   // Constraints.
   c <== a * b; // The constraint that ensures that c is equal to a times b.
}

// The main component of the circuit, which uses the Multiplier2 template.
component main = Multiplier2();
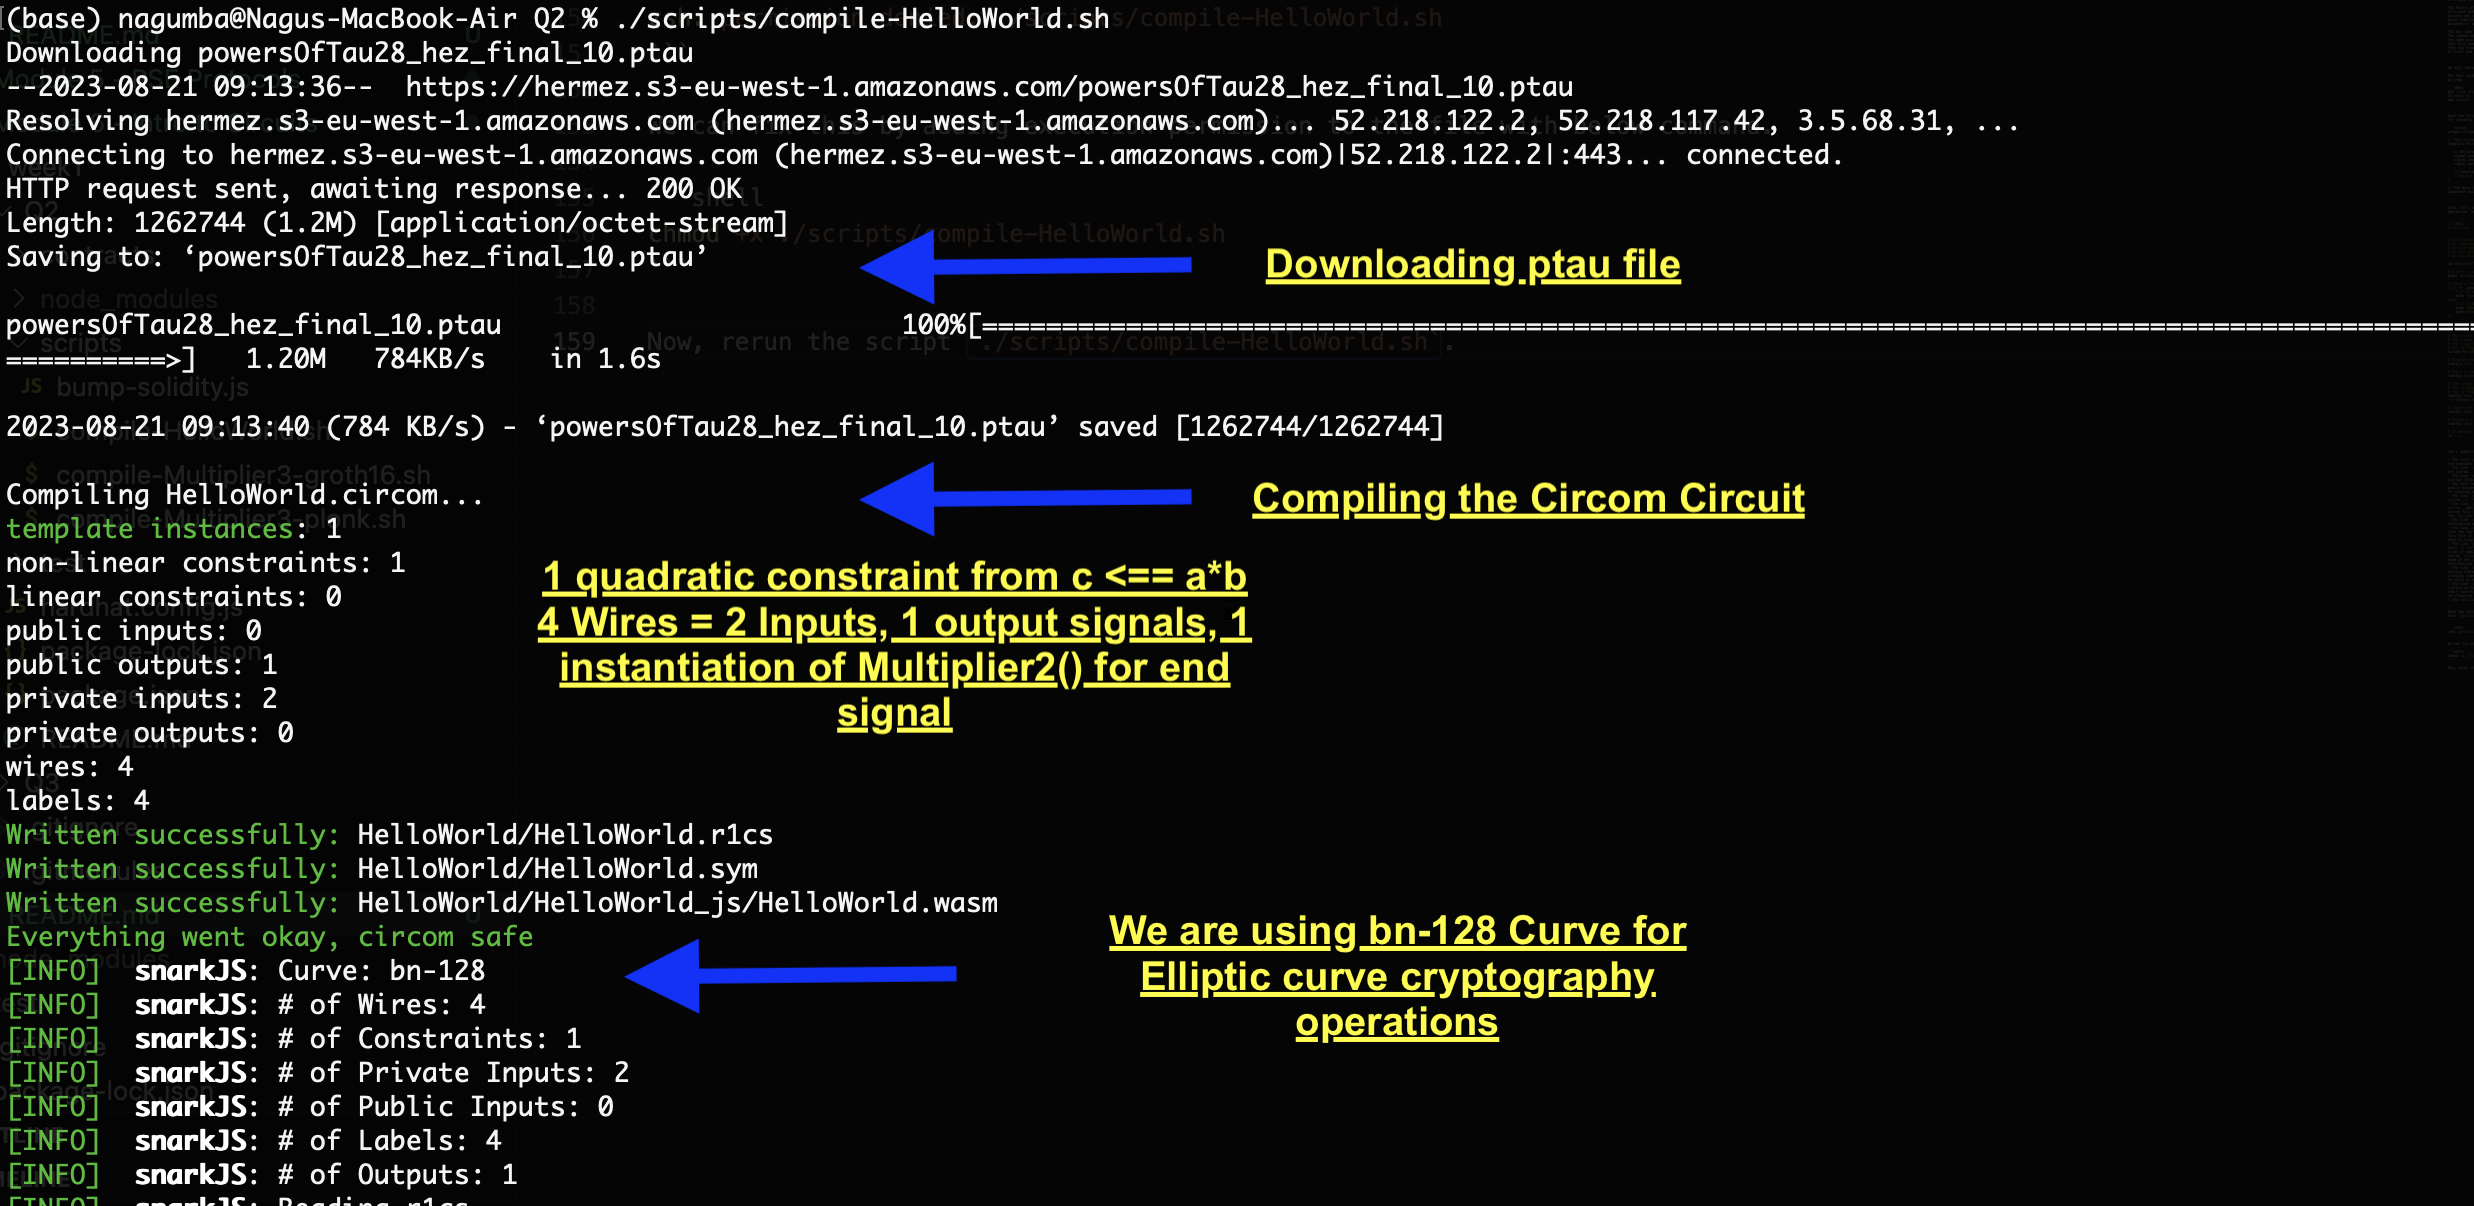
Also, let’s open the file compile-HelloWorld.sh. This file is a script that automates running the standard ZKSNARK operations for the circuits.
#!/bin/bash
# This script is for creating a HelloWorld circuit using circom and snarkjs
# It requires circom, snarkjs, and wget to be installed
# It also requires the powersOfTau28_hez_final_10.ptau file to be downloaded from the hermez website
# It will generate a HelloWorld circuit, a verification key, and a solidity verifier contract
# To run this ZKSNARKS operations script, your working directory shoould be /week1/Q2/
cd contracts/circuits
# Create a new directory for the HelloWorld circuit
mkdir HelloWorld
# Check if the powersOfTau28_hez_final_10.ptau file exists
if [ -f ./powersOfTau28_hez_final_10.ptau ]; then
# If it exists, skip the download step
echo "powersOfTau28_hez_final_10.ptau already exists. Skipping."
else
# If it does not exist, download it from the hermez website
echo 'Downloading powersOfTau28_hez_final_10.ptau'
wget https://hermez.s3-eu-west-1.amazonaws.com/powersOfTau28_hez_final_10.ptau
fi
# Compile the HelloWorld.circom file using circom
echo "Compiling HelloWorld.circom..."
# The --r1cs flag generates a rank-1 constraint system file
# The --wasm flag generates a WebAssembly file
# The --sym flag generates a symbolic information file
# The -o flag specifies the output directory
circom HelloWorld.circom --r1cs --wasm --sym -o HelloWorld
# Display some information about the generated r1cs file using snarkjs
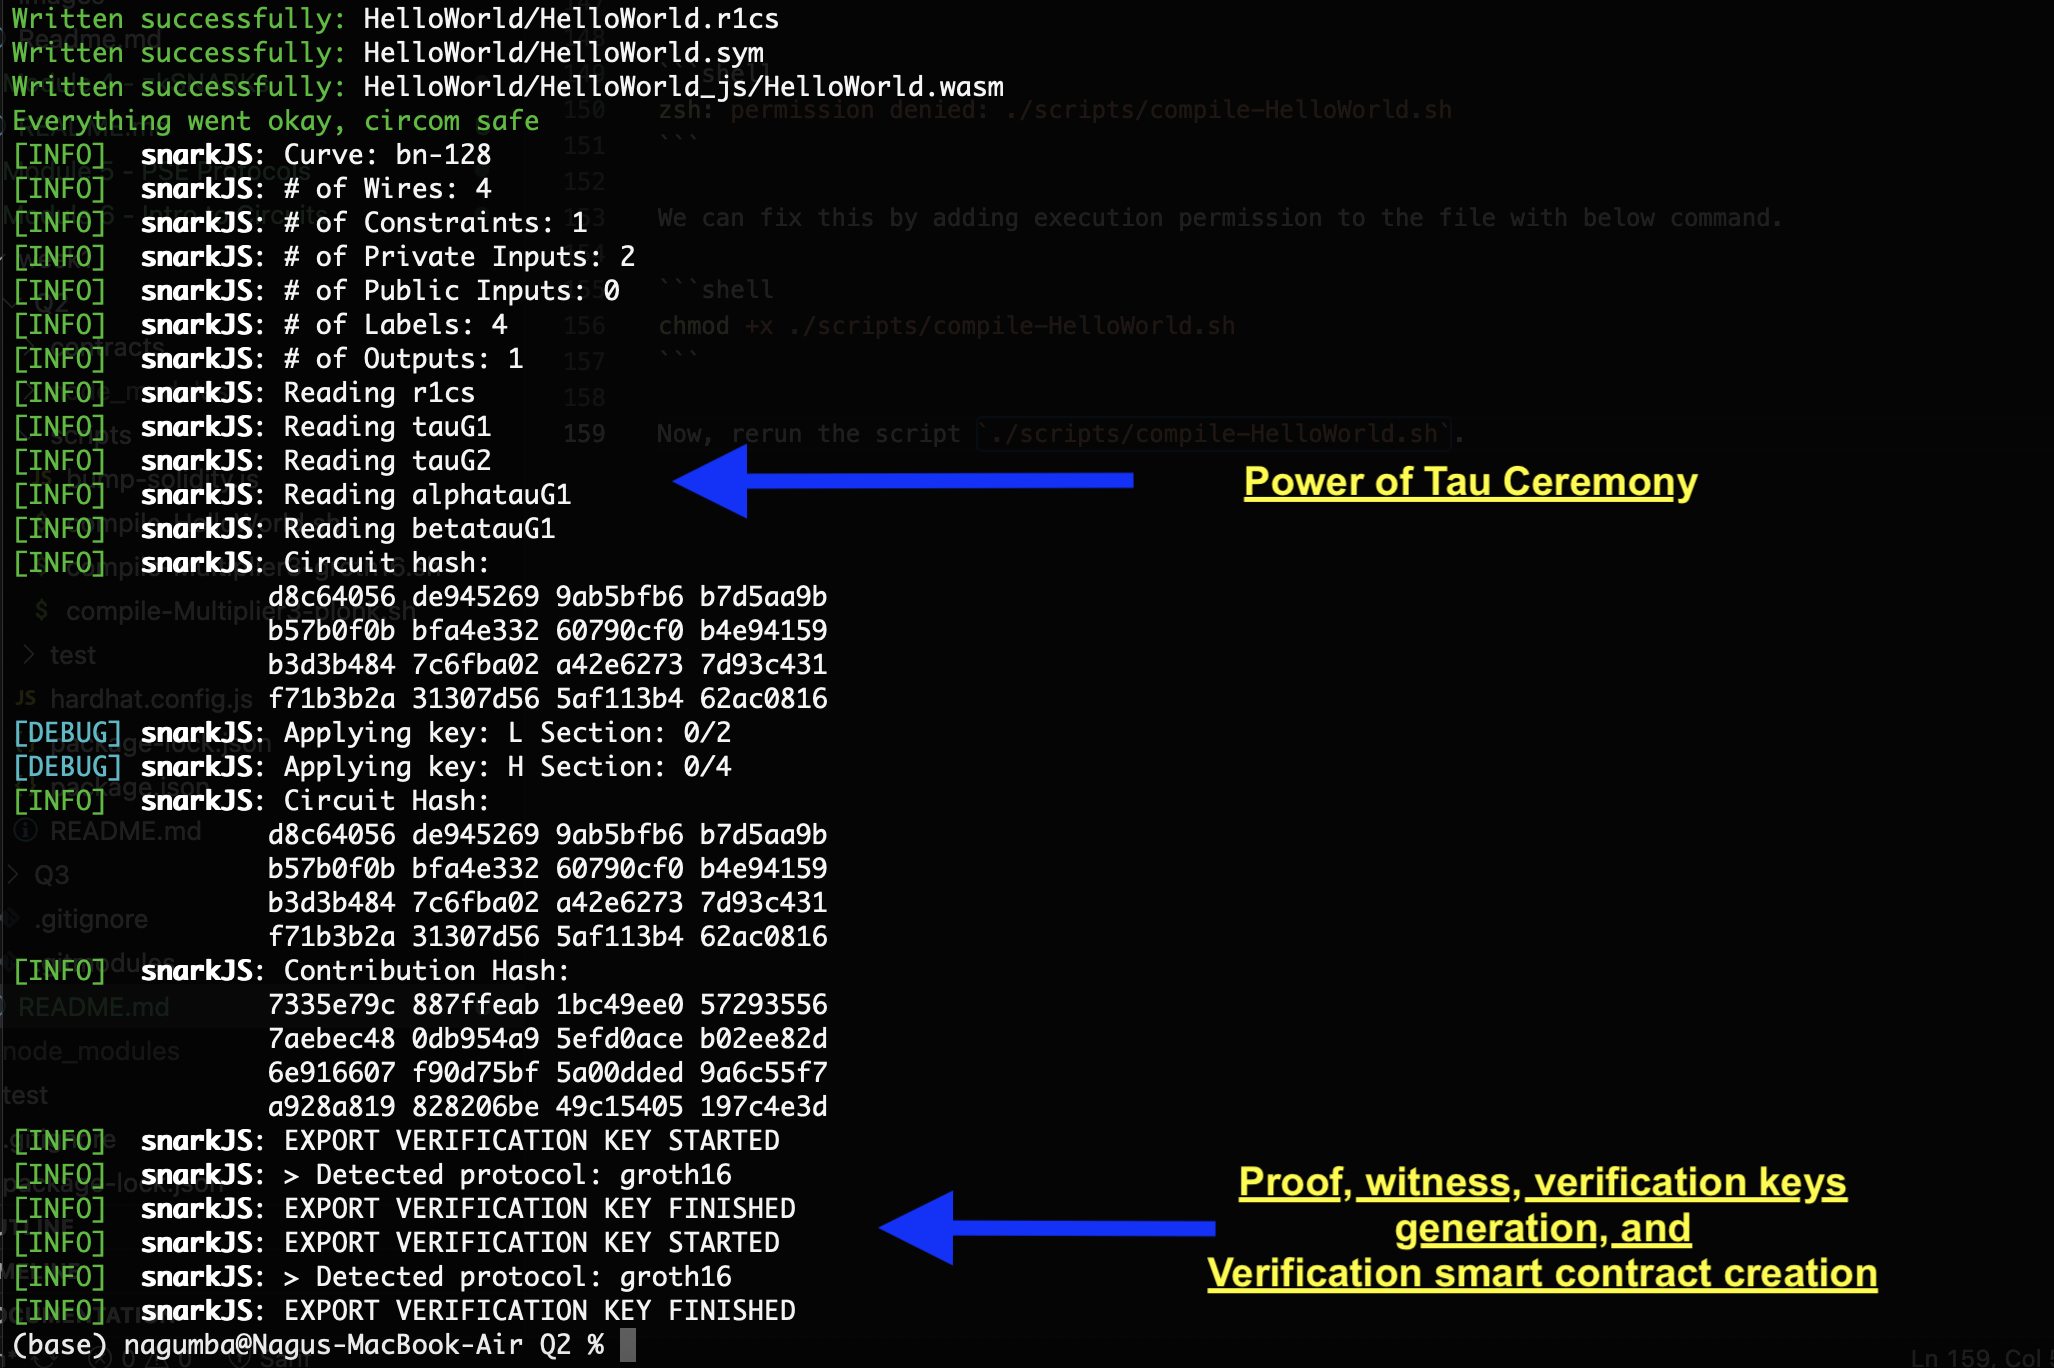
snarkjs r1cs info HelloWorld/HelloWorld.r1cs
# Start a new zkey file and make a contribution using snarkjs and the powersOfTau28_hez_final_10.ptau file
snarkjs groth16 setup HelloWorld/HelloWorld.r1cs powersOfTau28_hez_final_10.ptau HelloWorld/circuit_0000.zkey
# The --name flag specifies the name of the contributor
# The -v flag enables verbose mode
# The -e flag specifies the entropy source for the contribution
snarkjs zkey contribute HelloWorld/circuit_0000.zkey HelloWorld/circuit_final.zkey --name="1st Contributor Name" -v -e="random text"
# Export the verification key from the final zkey file as a JSON file using snarkjs
snarkjs zkey export verificationkey HelloWorld/circuit_final.zkey HelloWorld/verification_key.json
# Generate a solidity contract for verifying proofs using the final zkey file and snarkjs
snarkjs zkey export solidityverifier HelloWorld/circuit_final.zkey ../HelloWorldVerifier.sol
# Go back to the root directory
cd ../..
Let’s walk through this script line by line to understand these ZKSNARK operations workflow.
- The first line
#!/bin/bashtells the operating system that this is a bash script, which is a type of program that can run commands in a terminal. - The line
cd contracts/circuitschanges the current directory tocontracts/circuits, which is where the circuit files are stored. - The line
mkdir HelloWorldcreates a new directory calledHelloWorldinside the current directory. This is where the circuit files for the HelloWorld circuit will be stored. - The next few lines check if the file
powersOfTau28_hez_final_10.ptauexists in the current directory. This file is a public parameter file that is needed for generating proofs. It contains some precomputed values that speed up the process of creating proofs. If the file does not exist, the script downloads it from the hermez website using thewgetcommand. - The line
echo "Compiling HelloWorld.circom..."prints a message to the terminal that says “Compiling HelloWorld.circom…”. This is to inform the user that the next step is to compile the circuit file using circom. - The line
circom HelloWorld.circom --r1cs --wasm --sym -o HelloWorldruns the circom compiler on the fileHelloWorld.circom, which contains the code for the HelloWorld circuit. The compiler generates three files: a rank-1 constraint system file (.r1cs), a WebAssembly file (.wasm), and a symbolic information file (.sym). These files are stored in theHelloWorlddirectory, which is specified by the-oflag. - The line
snarkjs r1cs info HelloWorld/HelloWorld.r1csruns the snarkjs library on the.r1csfile and displays some information about it, such as the number of constraints, variables, and inputs in the circuit. - The line
snarkjs groth16 setup HelloWorld/HelloWorld.r1cs powersOfTau28_hez_final_10.ptau HelloWorld/circuit_0000.zkeyruns the snarkjs library on the.r1csfile and the.ptaufile and generates a new file calledcircuit_0000.zkey. This file is a zero-knowledge key file that contains some information about the circuit and the public parameters. It is used to create proofs and verification keys for the circuit. - The line
snarkjs zkey contribute HelloWorld/circuit_0000.zkey HelloWorld/circuit_final.zkey --name="1st Contributor Name" -v -e="random text"runs the snarkjs library on the.zkeyfile and makes a contribution to it. A contribution is a way of adding some randomness to the.zkeyfile to make it more secure. The contribution generates a new.zkeyfile calledcircuit_final.zkey, which is the final version of the zero-knowledge key file. The--nameflag specifies the name of the contributor, which can be any string. The-vflag enables verbose mode, which prints more details about the contribution process. The-eflag specifies the entropy source for the contribution, which can be any string. - The line
snarkjs zkey export verificationkey HelloWorld/circuit_final.zkey HelloWorld/verification_key.jsonruns the snarkjs library on the final.zkeyfile and exports a verification key from it. A verification key is a JSON file that contains some information about how to verify proofs for the circuit. It is used by anyone who wants to check if a proof is valid or not. - The line
snarkjs zkey export solidityverifier HelloWorld/circuit_final.zkey ../HelloWorldVerifier.solruns the snarkjs library on the final.zkeyfile and exports a solidity verifier contract from it. A solidity verifier contract is a smart contract written in solidity that can verify proofs for the circuit on the Ethereum blockchain. It uses the verification key as an input and returns true or false depending on whether a proof is valid or not. - The last line
cd ../..changes the current directory back to where it was before running the script.
When you first run the script ./scripts/compile-HelloWorld.sh, you may get the below error. This is because we don’t have execution permission on the script.
zsh: permission denied: ./scripts/compile-HelloWorld.sh
We can fix this by adding execution permission to the file with below command.
chmod +x ./scripts/compile-HelloWorld.sh
Now, rerun the script ./scripts/compile-HelloWorld.sh. We will see below output. I added comments in the output show you the results of different ZKSNARK operations.
Exercises - Trusted Setup
Now, let’s answer basic the questions about the trusted setup.
Question What does the circuit in HelloWorld.circom do?
Answer: The circuit in HelloWorld.circom performs a simple arithmetic operation. It takes two input signals as numbers and multiplies them together. The result is the output signal of the circuit.
Question Lines 7-12 of compile-HelloWorld.sh download a file called powersOfTau28_hez_final_10.ptau for Phase 1 trusted setup. What is a Powers of Tau ceremony? Explain why this is important in the setup of zk-SNARK applications.
Answer: A Powers of Tau ceremony is a type of trusted setup ceremony for zk-SNARK applications. A trusted setup ceremony is a process where multiple parties collaborate to generate some public parameters that are needed for creating and verifying proofs. The public parameters are also called a common reference string (CRS). The Powers of Tau ceremony is based on an interactive protocol where each party contributes some randomness to the CRS and keeps their input secret. The final CRS is secure as long as at least one party is honest and does not reveal their input. This is important because the CRS is used to ensure the soundness and privacy of the proofs. If the CRS is compromised, an attacker could create fake proofs or learn some information about the secret inputs of the proofs.
Question Line 24 of compile-HelloWorld.sh makes a random entropy contribution as a Phase 2 trusted setup. How are Phase 1 and Phase 2 trusted setup ceremonies different from each other?
Answer: Phase 1 and Phase 2 trusted setup ceremonies have different purposes and scopes. Phase 1 is a universal ceremony that can be used for any circuit. It generates a large CRS that contains all the possible powers of a fixed element in a finite field. Phase 2 is a circuit-specific ceremony that adapts the CRS from Phase 1 to a particular circuit. It reduces the size of the CRS and adds some circuit-specific information to it.
Non-Quadratic Constraints
Non-quadratic constraints are not allowed in circom. However, there are some ways to achieve non-quadratic constraints by using some tricks or techniques. We reduce the original non-quadratic constraints into a set of quadratic of linear constraints using some auxiliary variables.
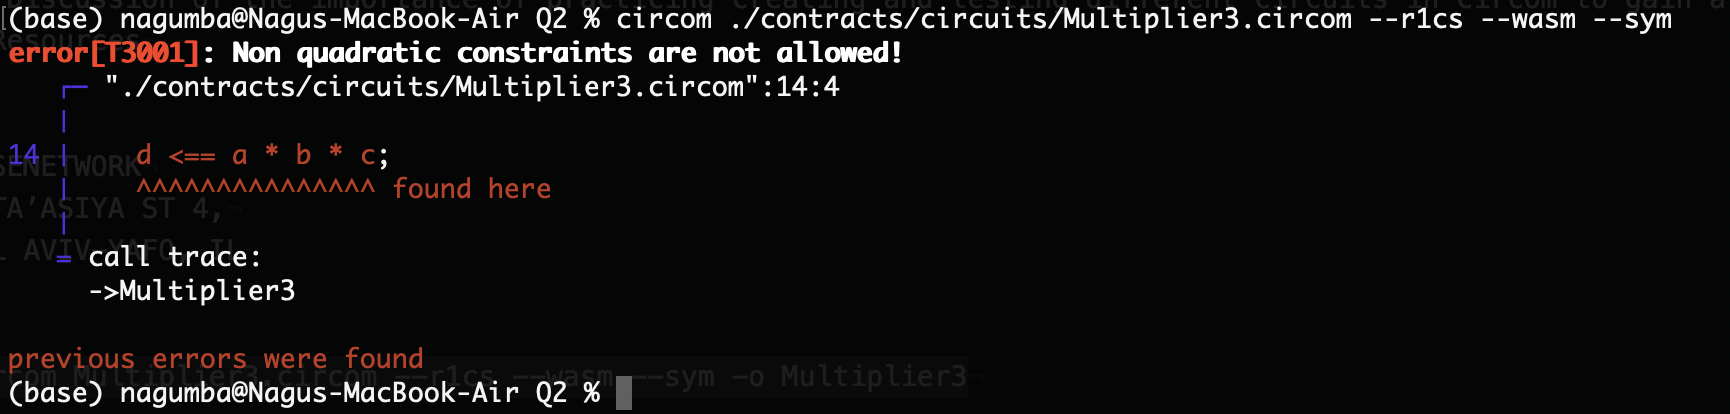
For example, in the Multiplier3.circom, we have multiplication of three input signals.
pragma circom 2.1.4;

// [assignment] Modify the circuit below to perform a multiplication of three signals

template Multiplier3 () {

   // Declaration of signals.
   signal input a;
   signal input b;
   signal input c;
   signal output d;

   // Constraints.
   d <== a * b * c;
}

component main = Multiplier3();
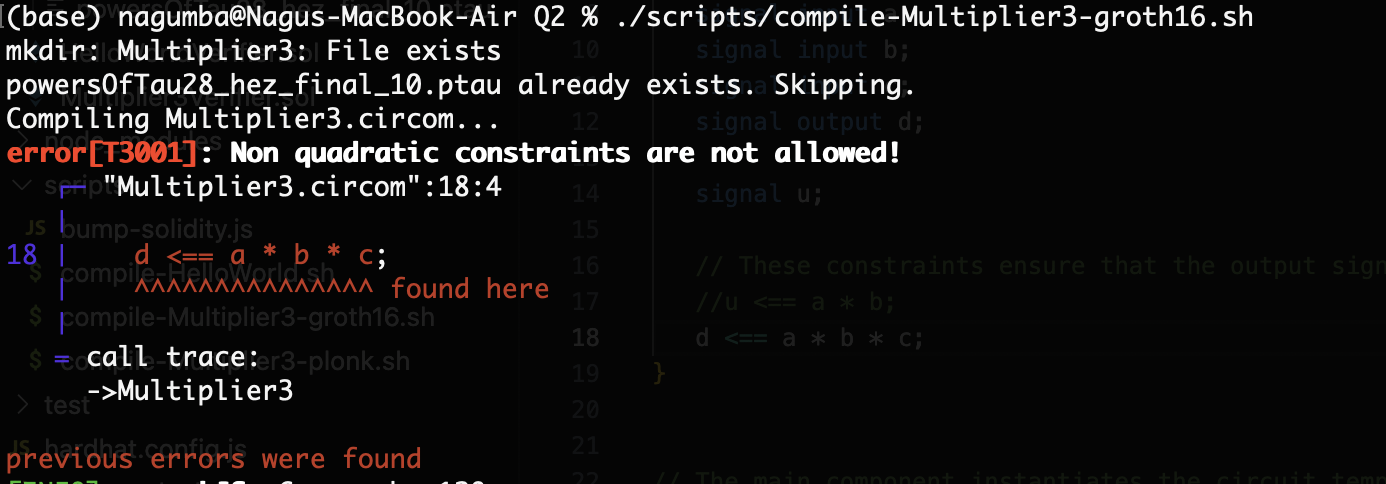
If we compile the circuit Multiplier3.circom, we will get the following error. Let’s compile it and see what we get:
circom ./contracts/circuits/Multiplier3.circom --r1cs --wasm --sym
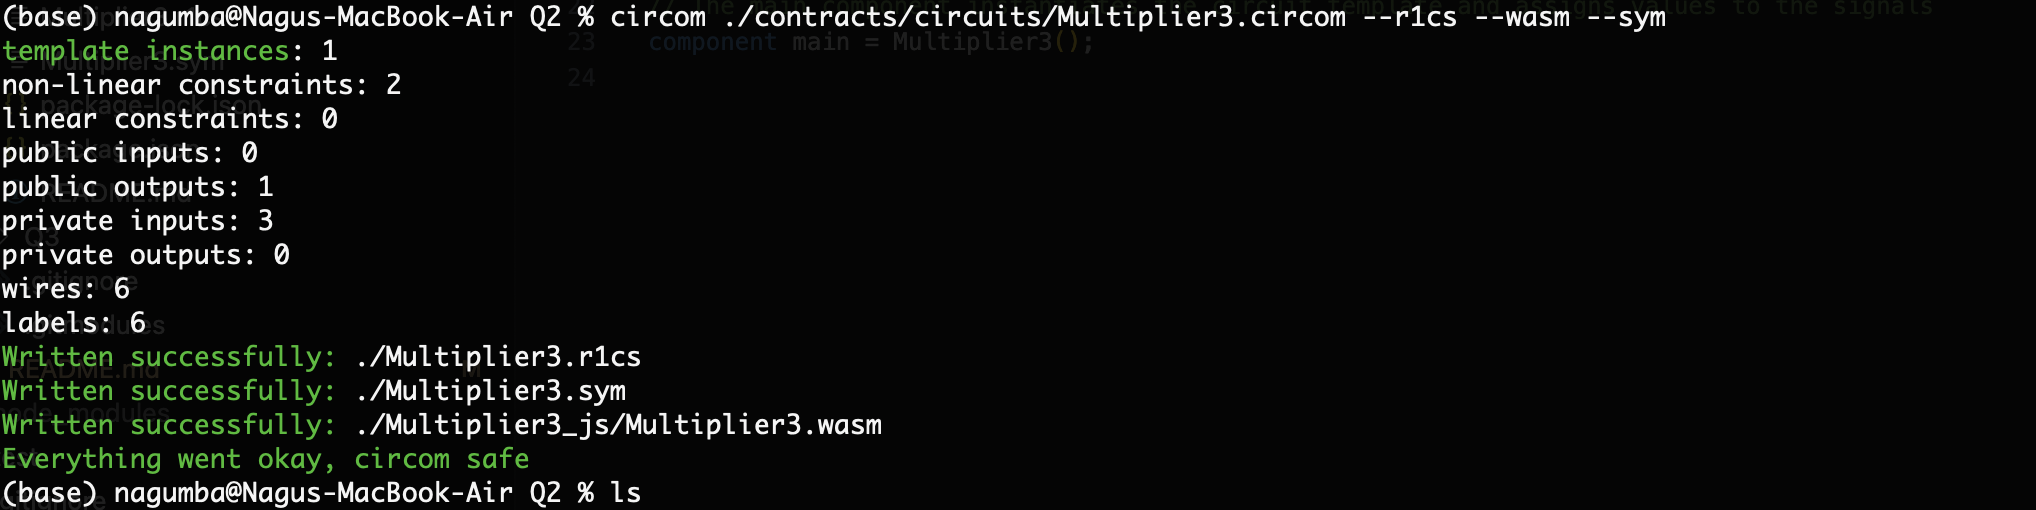
We can fix this by introducing an auxiliary variable like below.
u <== a * b;
d <== u * c;
Our updated circuit looks like below:
pragma circom 2.1.4;

// Modified circuit to perform a multiplication of three signals
template Multiplier3 () {

   // Declaration of signals.
   // The input signals are a, b, and c, which are numbers
   // The output signal is d, which is also a number
   signal input a;
   signal input b;
   signal input c;
   signal output d;

   signal u;

   // These constraints ensure that the output signal d is equal to the product of the three input signals a, b, and c
   u <== a * b;
   d <== u * c;
}


// The main component instantiates the circuit template and assigns values to the signals
component main = Multiplier3();
Now we can successfully compile this updated circuit Multiplier3.circom.
circom ./contracts/circuits/Multiplier3.circom --r1cs --wasm --sym
We get the following output:
Exercises - Non-Quadratic Constraints
- In the empty
scripts/compile-Multiplier3-groth16.sh, create a script to compilecontracts/circuits/Multiplier3.circomand create a verifier contract modelled aftercompile-HelloWorld.sh.
First, let’s update the script compile-Multiplier3-groth16.sh that will perform all the ZKSNARK operations for Multiplier3.circom circuit. Then we run the script and check the output.
#!/bin/bash

# This script is for creating a Multiplier3 circuit using circom and snarkjs
# It requires circom, snarkjs, and wget to be installed
# It also requires the powersOfTau28_hez_final_10.ptau file to be downloaded from the hermez website
# It will generate a Multiplier3 circuit, a verification key, and a solidity verifier contract
# To run this ZKSNARKS operations script, your working directory shoould be /week1/Q2/

cd contracts/circuits

# Create a new directory for the Multiplier3 circuit
mkdir Multiplier3

# Check if the powersOfTau28_hez_final_10.ptau file exists
if [ -f ./powersOfTau28_hez_final_10.ptau ]; then
    # If it exists, skip the download step
    echo "powersOfTau28_hez_final_10.ptau already exists. Skipping."
else
    # If it does not exist, download it from the hermez website
    echo 'Downloading powersOfTau28_hez_final_10.ptau'
    wget https://hermez.s3-eu-west-1.amazonaws.com/powersOfTau28_hez_final_10.ptau
fi

# Compile the Multiplier3.circom file using circom
echo "Compiling Multiplier3.circom..."

# The --r1cs flag generates a rank-1 constraint system file
# The --wasm flag generates a WebAssembly file
# The --sym flag generates a symbolic information file
# The -o flag specifies the output directory
circom Multiplier3.circom --r1cs --wasm --sym -o Multiplier3

# Display some information about the generated r1cs file using snarkjs
snarkjs r1cs info Multiplier3/Multiplier3.r1cs

# Start a new zkey file and make a contribution using snarkjs and the powersOfTau28_hez_final_10.ptau file
snarkjs groth16 setup Multiplier3/Multiplier3.r1cs powersOfTau28_hez_final_10.ptau Multiplier3/circuit_0000.zkey

# The --name flag specifies the name of the contributor
# The -v flag enables verbose mode
# The -e flag specifies the entropy source for the contribution
snarkjs zkey contribute Multiplier3/circuit_0000.zkey Multiplier3/circuit_final.zkey --name="1st Contributor Name" -v -e="random text"

# Export the verification key from the final zkey file as a JSON file using snarkjs
snarkjs zkey export verificationkey Multiplier3/circuit_final.zkey Multiplier3/verification_key.json

# Generate a solidity contract for verifying proofs using the final zkey file and snarkjs
snarkjs zkey export solidityverifier Multiplier3/circuit_final.zkey ../Multiplier3Verifier.sol

# Go back to the root directory
cd ../..
- Try to run
compile-Multiplier3-groth16.sh. You should encounter anerror[T3001]with the circuit as-is. Explain what the error means and how it arises.
When we run the script compile-Multiplier3-groth16.sh, we get the error[T3001] error. This error is related to non-quadratic constraint we had d <== a * b* c;.
We can fix this by using an auxiliary signal as shown below:
u <== a * b;
d <== u * c;
- Modify
Multiplier3.circomto perform a multiplication of three input signals under the restrictions of circom.
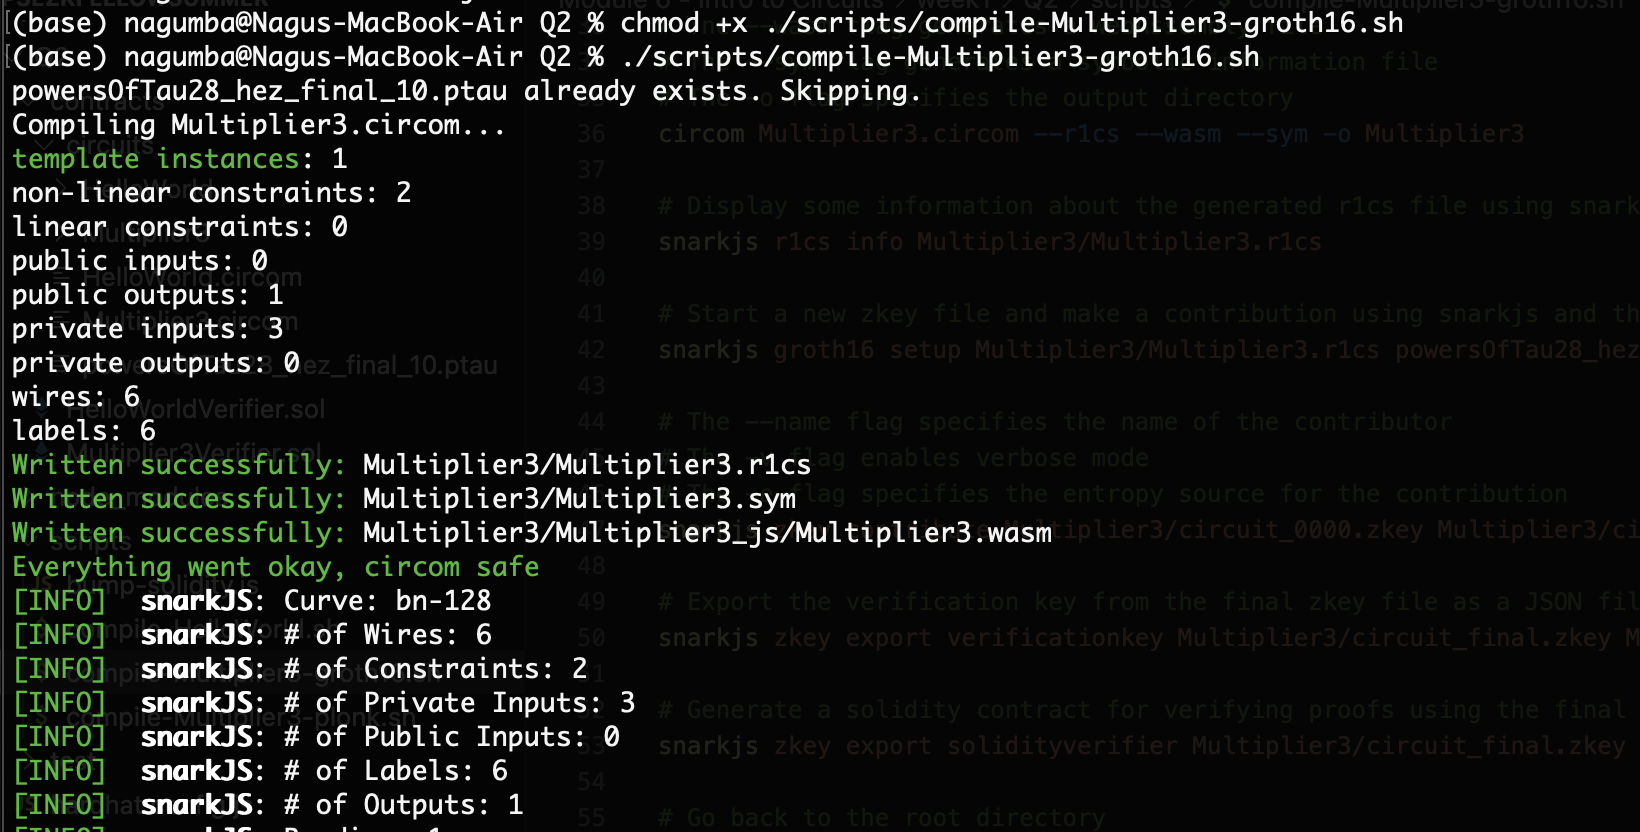
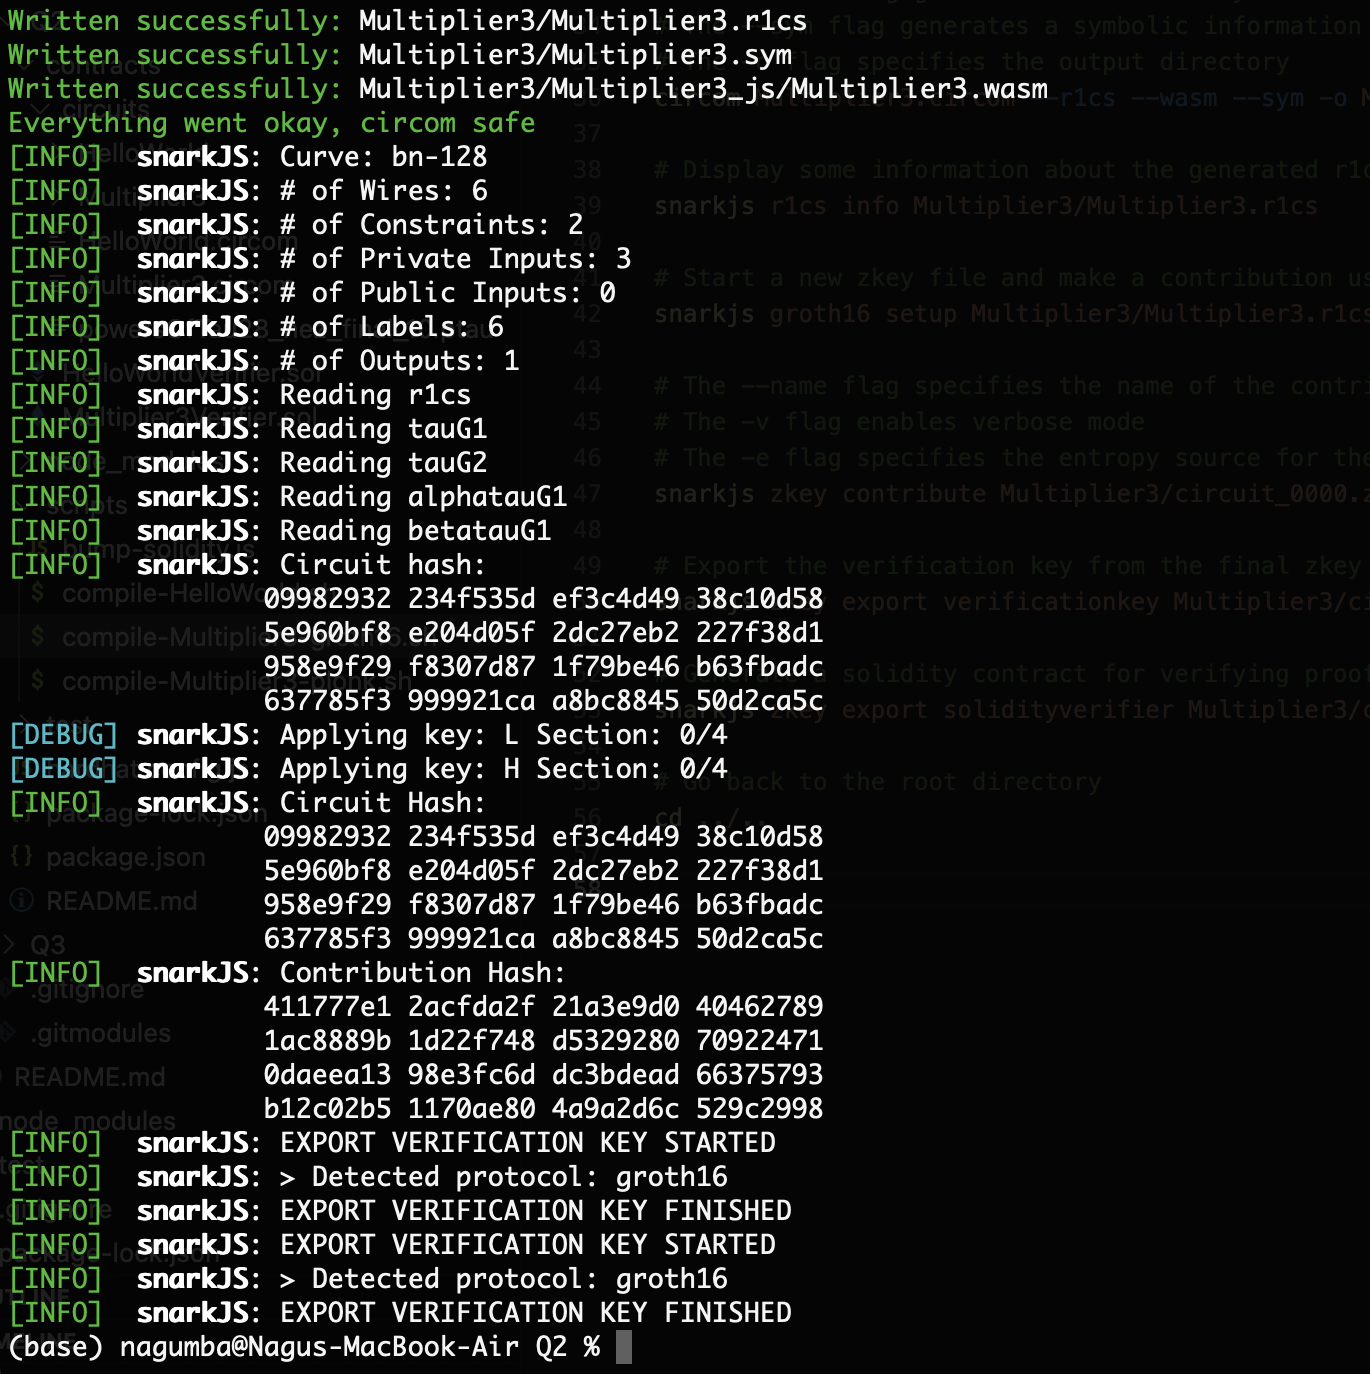
Now, the script compile-Multiplier3-groth16.sh performs the ZKSNARK operations to build the updated circuit Multiplier3.circom. It also creates a Groth16 trusted setup, keys for proof, witness and verification, and the solidity smart contract Multiplier3Verifier.sol. All these steps are completed successfully in the terminal.
pragma circom 2.1.4;

// Modified circuit to perform a multiplication of three signals
template Multiplier3 () {

   // Declaration of signals.
   // The input signals are a, b, and c, which are numbers
   // The output signal is d, which is also a number
   signal input a;
   signal input b;
   signal input c;
   signal output d;

   signal u;

   // These constraints ensure that the output signal d is equal to the product of the three input signals a, b, and c
   u <== a * b;
   d <== a * b * c;
}

// The main component instantiates the circuit template and assigns values to the signals
component main = Multiplier3();
Groth16 and PLONK Protocols
In the empty scripts/compile-Multiplier3-plonk.sh, create a script to compile circuit/Multiplier3.circom using PLONK in SnarkJS. Add a _plonk suffix to the build folder and the output contract to distinguish the two sets of output.
Question You will encounter an error zkey file is not groth16 if you just change snarkjs groth16 setup to snarkjs plonk setup. Resolve this error and answer the following question: How is the process of compiling with PLONK different from compiling with Groth16?
Answer For PLONK, Phase 2 (circuit-specific) contribution is not required.
Here is the script compile-Multiplier3-plonk.sh for the PLONK protocol to build Multiplier3.circom circuit.
#!/bin/bash

# This script is for creating a Multiplier3 circuit using circom and snarkjs using PLONK protocol
# It requires circom, snarkjs, and wget to be installed
# It also requires the powersOfTau28_hez_final_10.ptau file to be downloaded from the hermez website
# It will generate a Multiplier3 circuit, a verification key, and a solidity verifier contract
# To run this ZKSNARKS operations script, your working directory shoould be /week1/Q2/

cd contracts/circuits

# Create a new directory for the Multiplier3 circuit
mkdir Multiplier3_plonk

# Check if the powersOfTau28_hez_final_10.ptau file exists
if [ -f ./powersOfTau28_hez_final_10.ptau ]; then
    # If it exists, skip the download step
    echo "powersOfTau28_hez_final_10.ptau already exists. Skipping."
else
    # If it does not exist, download it from the hermez website
    echo 'Downloading powersOfTau28_hez_final_10.ptau'
    wget https://hermez.s3-eu-west-1.amazonaws.com/powersOfTau28_hez_final_10.ptau
fi

# Compile the Multiplier3.circom file using circom
echo "Compiling Multiplier3.circom..."

# The --r1cs flag generates a rank-1 constraint system file
# The --wasm flag generates a WebAssembly file
# The --sym flag generates a symbolic information file
# The -o flag specifies the output directory
circom Multiplier3.circom --r1cs --wasm --sym -o Multiplier3_plonk

# Display some information about the generated r1cs file using snarkjs
snarkjs r1cs info Multiplier3_plonk/Multiplier3.r1cs

# Start a new zkey file and make a contribution using snarkjs and the powersOfTau28_hez_final_10.ptau file
snarkjs plonk setup Multiplier3_plonk/Multiplier3.r1cs powersOfTau28_hez_final_10.ptau Multiplier3_plonk/circuit_final.zkey

# The --name flag specifies the name of the contributor
# The -v flag enables verbose mode
# The -e flag specifies the entropy source for the contribution
# snarkjs zkey contribute Multiplier3_plonk/circuit_0000.zkey Multiplier3_plonk/circuit_final.zkey --name="1st Contributor Name" -v -e="random text"

# Export the verification key from the final zkey file as a JSON file using snarkjs
snarkjs zkey export verificationkey Multiplier3_plonk/circuit_final.zkey Multiplier3_plonk/verification_key.json

# Generate a solidity contract for verifying proofs using the final zkey file and snarkjs
snarkjs zkey export solidityverifier Multiplier3_plonk/circuit_final.zkey ../Multiplier3Verifier.sol

# Go back to the root directory
cd ../..
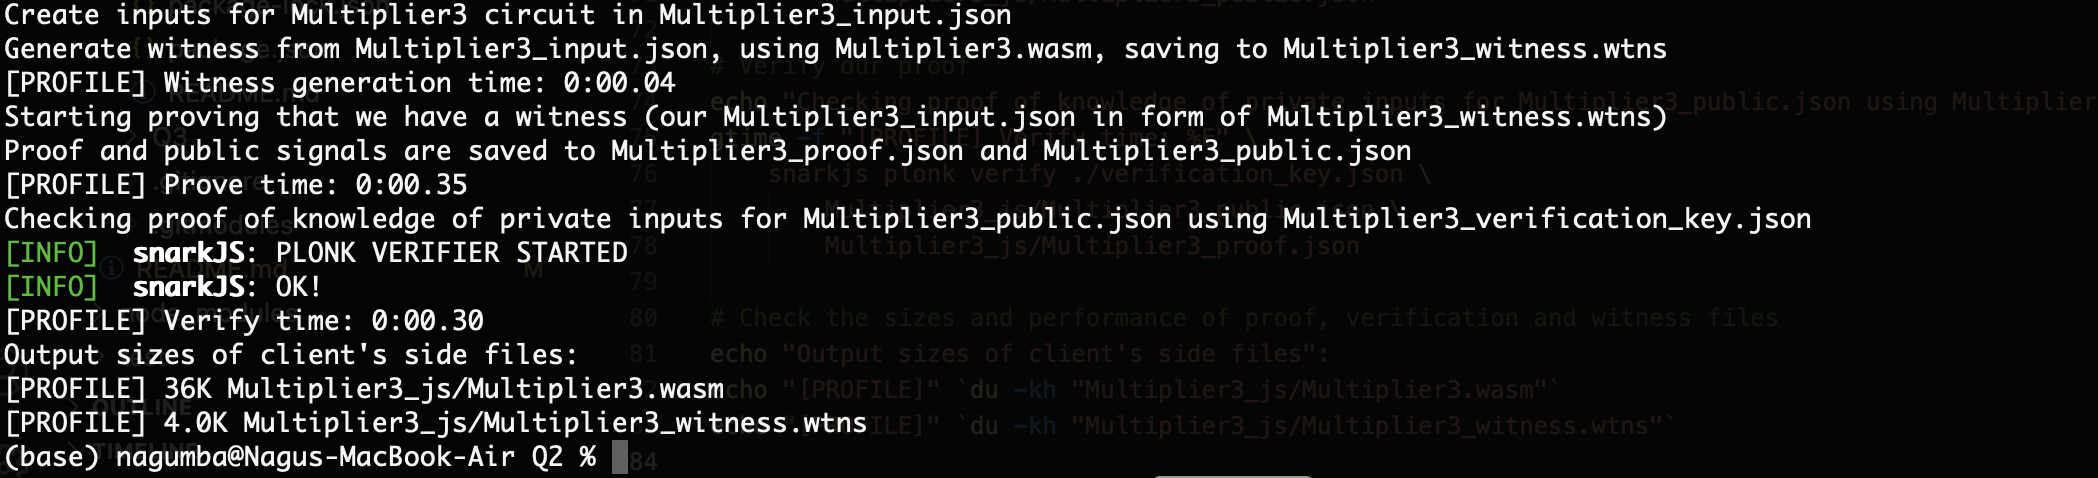
When you run this script, it will successfully build the PLONK based keys for proof, witness, verification and solidity contract.
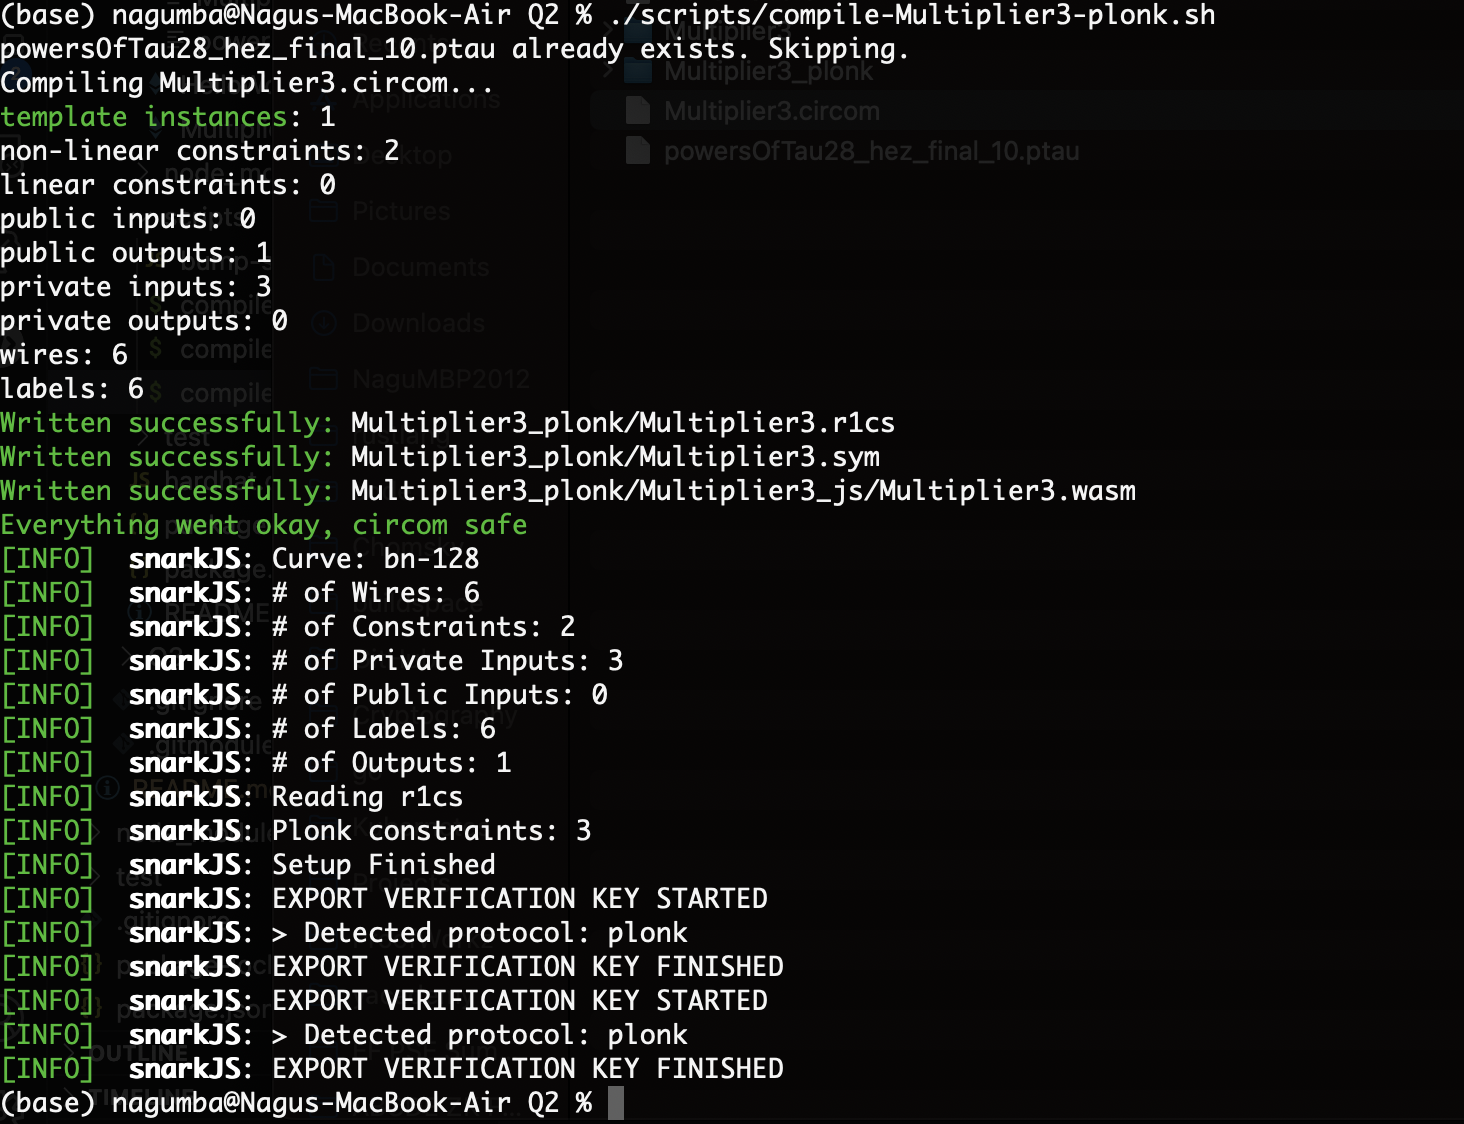
Question What are the practical differences between Groth16 and PLONK? Hint: compare and contrast the resulting contracts and running time of unit tests (see the next question below) from the two protocols.
Answer The contract size, gas cost, and verification time of PLONK are all higher than GROTH16 protocol.
Proof Generation, Computing Witness, Verification and Testing
Let’s do some testing on our circuits.
There is no direct way to do unit testing Circom circuits within Circom, as circom is only a compiler that outputs the circuit representation and the constraints. However, you can use external tools such as snarkjs or circom-helper to test your circuits and generate proofs. These tools allow you to compile, calculate witnesses, verify proofs, and debug your circuits using the circom language.
We can also use nodejs do unit testing, checking proofs, generating witness, etc.
First, let us use snarkjs to do some basic ZKSNARK operations like verifying proofs, computing witness, etc. Then we can use nodejs to do more detailed unit testing of teh circuits and verifier smart contracts.
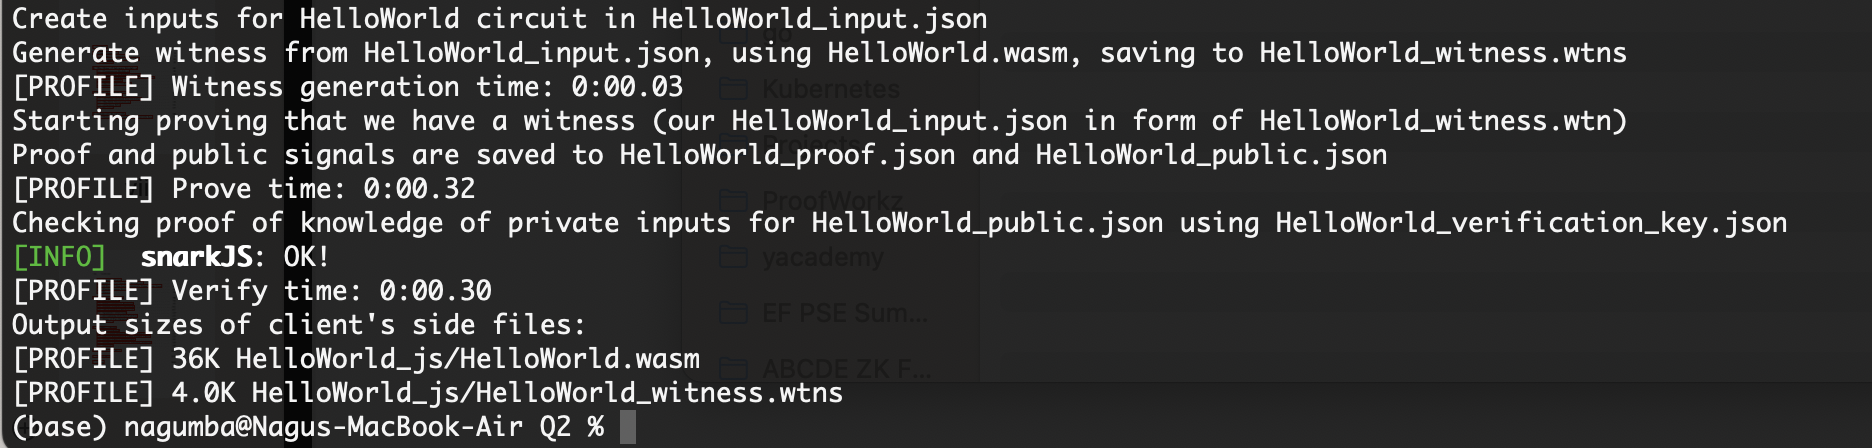
Let’s create the input file for HelloWorld circuit.
cd contracts/circuits/HelloWorld

# Create input file
echo "Create inputs for HelloWorld circuit in HelloWorld_input.json"
echo "{\"a\": \"3\", \"b\": \"11\"}" > ./HelloWorld_input.json
Now, calculate the witness for the circuit.
# Calculate witness
echo "Generate witness from HelloWorld_input.json, using HelloWorld.wasm, saving to HelloWorld_witness.wtns"
gtime -f "[PROFILE] Witness generation time: %E" \
    node HelloWorld_js/generate_witness.js HelloWorld_js/HelloWorld.wasm ./HelloWorld_input.json \
        HelloWorld_js/HelloWorld_witness.wtns
Then, create proof of our witness.
# Create a proof for our witness
echo "Starting proving that we have a witness (our HelloWorld_input.json in form of HelloWorld_witness.wtn)"
echo "Proof and public signals are saved to HelloWorld_proof.json and HelloWorld_public.json"
gtime -f "[PROFILE] Prove time: %E" \
    snarkjs groth16 prove ./circuit_final.zkey HelloWorld_js/HelloWorld_witness.wtns \
        HelloWorld_js/HelloWorld_proof.json \
        HelloWorld_js/HelloWorld_public.json
Then, finally, verify our proof.
# Verify our proof
echo "Checking proof of knowledge of private inputs for HelloWorld_public.json using HelloWorld_verification_key.json"
gtime -f "[PROFILE] Verify time: %E" \
    snarkjs groth16 verify ./verification_key.json \
        HelloWorld_js/HelloWorld_public.json \
        HelloWorld_js/HelloWorld_proof.json
Let’s calculate some benchmarks statistics (performance in time and size of the various keys).
# Check the sizes and performance of proof, verification and witness files
echo "Output sizes of client's side files":
echo "[PROFILE]" `du -kh "HelloWorld_js/HelloWorld.wasm"`
echo "[PROFILE]" `du -kh "HelloWorld_js/HelloWorld_witness.wtns"`
We can combine the above steps and add them to our ZKSNARKS operations workflow script compile-HelloWorld.sh.
When we rerun the script, compile-HelloWorld.sh, we will see all the operations of our HellowWorld.circom circuit.
We can similarly update the script for Multiplier3.circom circuit for both GROTH16 and PLONK ZKSNARKs operations.
When we run the script compile-Multiplier3-groth16.sh, we can see the successful verification, witness generation and test.
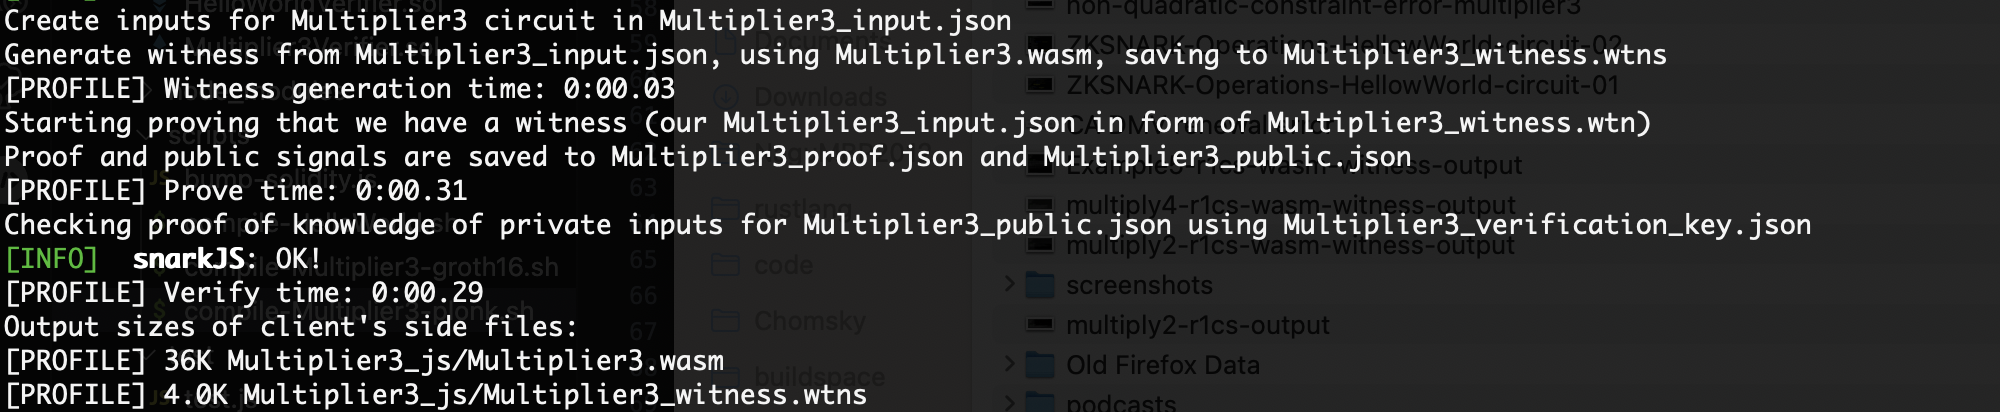
When we run the script compile-Multiplier3-groth16.sh, we can see the successful verification, witness generation and test.
You can find the full code at the repo ZKSNARKS